PyQt5 教程 - 多选按钮

在本教程中,我们将学习 PyQt5 中的 QCheckBox。QCheckBox 是一个可以选中或取消选中的选项按钮。用户可以从复选框组中选中多个选项。
CheckBox 示例
import sys
from PyQt5.QtWidgets import QWidget, QLabel, QHBoxLayout, QCheckBox, QApplication


class basicWindow(QWidget):
    def __init__(self):
        super().__init__()

        layout = QHBoxLayout()
        self.setLayout(layout)

        self.checkBoxA = QCheckBox("Select This.")
        self.labelA = QLabel("Not slected.")

        layout.addWidget(self.checkBoxA)
        layout.addWidget(self.labelA)

        self.setGeometry(200, 200, 300, 200)

        self.setWindowTitle("CheckBox Example")


if __name__ == "__main__":
    app = QApplication(sys.argv)
    windowExample = basicWindow()
    windowExample.show()
    sys.exit(app.exec_())
这里,
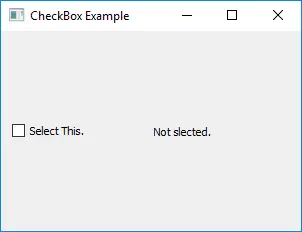
self.checkBoxA = QCheckBox("Select This.")
self.checkBoxA 是 PyQt5 中 QCheckBox 控件的一个实例。给出的文字 - Select This. 将显示在 CheckBox 空心方块旁边。

CheckBox 事件
用户行为一般为选中或取消选中复选框,然后应该根据状态更改信号执行操作。
import sys
from PyQt5.QtWidgets import QWidget, QLabel, QHBoxLayout, QCheckBox, QApplication
from PyQt5 import QtCore


class basicWindow(QWidget):
    def __init__(self):
        super().__init__()

        layout = QHBoxLayout()
        self.setLayout(layout)

        self.checkBoxA = QCheckBox("Select This.")
        self.labelA = QLabel("Not slected.")

        self.checkBoxA.stateChanged.connect(self.checkBoxChangedAction)

        layout.addWidget(self.checkBoxA)
        layout.addWidget(self.labelA)

        self.setGeometry(200, 200, 300, 200)

        self.setWindowTitle("CheckBox Example")

    def checkBoxChangedAction(self, state):
        if QtCore.Qt.Checked == state:
            self.labelA.setText("Selected.")
        else:
            self.labelA.setText("Not Selected.")


if __name__ == "__main__":
    app = QApplication(sys.argv)
    windowExample = basicWindow()
    windowExample.show()
    sys.exit(app.exec_())
self.checkBoxA.stateChanged.connect(self.checkBoxChangedAction)
我们将 slot 方法 checkBoxChangeAction() 连接到 CheckBox stateChanged 信号。每次用户选中或取消选中复选框时,它都会调用 checkBoxChangeAction()。
def checkBoxChangedAction(self, state):
    if QtCore.Qt.Checked == state:
        self.labelA.setText("Selected.")
    else:
        self.labelA.setText("Not Selected.")
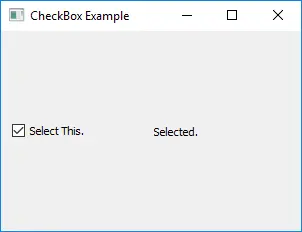
state 参数是 CheckBox 传递的状态,如果选中复选框的话,labelA 文本将变为 Selected.,而没选中的话,会显示 Not Selected。

Founder of DelftStack.com. Jinku has worked in the robotics and automotive industries for over 8 years. He sharpened his coding skills when he needed to do the automatic testing, data collection from remote servers and report creation from the endurance test. He is from an electrical/electronics engineering background but has expanded his interest to embedded electronics, embedded programming and front-/back-end programming.
LinkedIn