Angular 中的富文本编辑器

我们将介绍如何在 Angular 中制作富文本编辑器以及我们可以创建哪些库。
在 Angular 中使用 Angular-Editor 库创建富文本编辑器
在创建内容管理系统或任何需要允许用户编辑内容的功能的 Web 软件时,我们有两种选择:使用纯文本或制作富文本编辑器。富文本编辑器用于使用它提供的许多选项来格式化文本。
我们可以添加将转换为 HTML 内容的图像、链接、音频和视频。
Angular 中有很多库可以帮助我们在 Web 应用程序中集成富文本编辑器,例如 Angular-Editor、Angular Trix、Angular Meditor、ngQuill 和 Angular inline text editor。
我们将用来制作富文本编辑器的库是@kolkov/angular-editor。我们可以使用 npm 包管理器安装 @kolkov/angular-editor。
# CLI
npm install @kolkov/angular-editor --save
安装后,我们需要从 app.module.ts 中的@angular/common/http 和@kolkov/angular-editor 中导入 HttpClientModule 和 AngularEditorModule。
我们的 app.module.ts 将如下所示。
# angular
import { NgModule } from '@angular/core';
import { BrowserModule } from '@angular/platform-browser';
import { FormsModule } from '@angular/forms';
import { HttpClientModule} from '@angular/common/http';

import { AppComponent } from './app.component';
import { HelloComponent } from './hello.component';
import { AngularEditorModule } from '@kolkov/angular-editor';


@NgModule({
  imports:      [ BrowserModule, FormsModule, AngularEditorModule, HttpClientModule ],
  declarations: [ AppComponent, HelloComponent ],
  bootstrap:    [ AppComponent ]
})
export class AppModule { }
现在我们可以使用 AngularEditorConfig 配置我们的富文本编辑器。我们可以进行以下配置。
| 配置 | 类型 | 默认 | 描述 |
|---|---|---|---|
editable |
Boolean |
true |
启用或禁用编辑器 |
spellcheck |
Boolean |
true |
启用或禁用拼写检查 |
translate |
string |
yes |
启用或禁用翻译 |
sanitize |
Boolean |
true |
启用或禁用 DOM 清理 |
height |
string |
auto |
我们可以使用它来设置编辑器的高度 |
minHeight |
string |
0 |
我们可以使用它来设置编辑器的最小高度 |
maxHeight |
string |
auto |
我们可以使用它来设置编辑器的最大高度 |
width |
string |
auto |
我们可以使用它来设置编辑器的宽度 |
minWidth |
string |
0 |
我们可以使用它来设置编辑器的最小宽度 |
enableToolbar |
Boolean |
true |
启用或禁用工具栏 |
showToolbar |
Boolean |
true |
显示或隐藏工具栏 |
toolbarPosition |
string |
top |
我们可以将工具栏的位置设置为顶部或底部 |
placeholder |
string |
- | 我们可以为编辑器设置一个占位符 |
defaultParagraphSeparator |
string |
- | 我们可以定义默认的段落分隔符,例如 p 标签 |
defaultFontName |
string |
- | 我们可以设置默认字体,例如 Arial |
defaultFontSize |
string |
- | 我们可以设置默认字体大小 |
uploadUrl |
string |
- | 我们可以设置图像上传端点并使用 imageUrl 键返回响应。{"imageUrl" : } |
upload |
function |
- | 我们可以使用它的图像上传功能。 |
uploadWithCredentials |
Boolean |
false |
我们可以使图像上传密码保护与否。 |
fonts |
Font[] |
- | 我们可以设置一个可以使用的字体数组,比如 [{name, class}] 等。 |
customClasses |
CustomClass[] |
- | 我们可以设置可在编辑器中使用的可用类数组。 |
outline |
Boolean |
true |
我们可以在焦点中设置编辑器的轮廓。 |
toolbarHiddenButtons |
string[][] |
- | 我们可以设置一组按钮名称或将被隐藏的元素。 |
使用上面的配置,我们将配置我们的富文本编辑器。
# angular
import { Component } from '@angular/core';
import { AngularEditorConfig } from '@kolkov/angular-editor';

@Component({
  selector: 'my-app',
  templateUrl: './app.component.html',
  styleUrls: ['./app.component.css'],
})
export class AppComponent {
  name = 'Angular 6';
  htmlContent = '';

  config: AngularEditorConfig = {
    editable: true,
    spellcheck: true,
    height: '10rem',
    minHeight: '5rem',
    placeholder: 'Enter text in this rich text editor....',
    defaultParagraphSeparator: 'p',
    defaultFontName: 'Arial',
    customClasses: [
      {
        name: 'Quote',
        class: 'quoteClass',
      },
      {
        name: 'Title Heading',
        class: 'titleHead',
        tag: 'h1',
      },
    ],
  };
}
我们将使用 angular-editor 标签创建一个模板来显示我们的富文本编辑器和富文本编辑器的输出;我们将使用我们在 app.component.ts 中定义的 htmlContent 变量。
app.component.html 中的代码如下所示。
# angular
<h1>AngularEditor</h1>
<angular-editor [(ngModel)]="htmlContent" [config]="config"></angular-editor>
<h1>HTML Output</h1>
<div class="html">
  {{ htmlContent }}
</div>
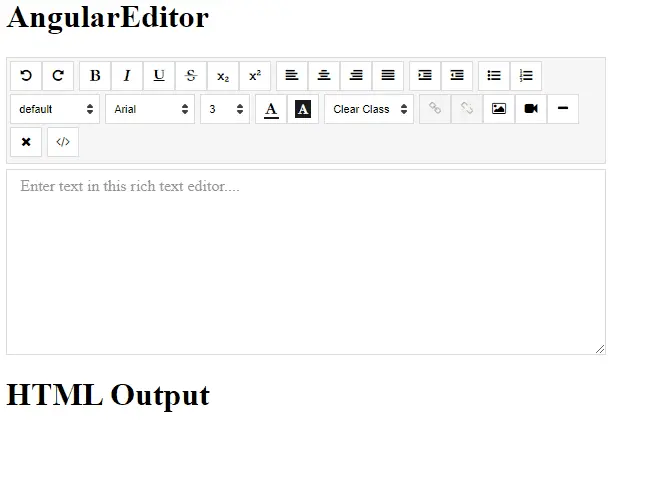
输出:

通过这种简单的方式,我们可以创建一个富文本编辑器。
Rana is a computer science graduate passionate about helping people to build and diagnose scalable web application problems and problems developers face across the full-stack.
LinkedIn