Tkinter 教程 - 標籤控制元件

label 標籤控制元件通過用來顯示靜態的文字或者影象,它的內容一般來說不是動態的。當然,你可以根據你的需求來改變它的內容。
from sys import version_info

if version_info.major == 2:
    import Tkinter as tk
elif version_info.major == 3:
    import tkinter as tk

app = tk.Tk()
labelExample = tk.Label(app, text="This is a Label")
labelExample.pack()
app.mainloop()
程式執行後,會在主程式視窗內生成一個文字標籤。

labelExample = tk.Label(app, text="This is a label")
labelExample 是在主視窗 app 內的一個顯示 This is a label 的標籤例項。
labelExample.pack()
pack() 方法用來對主控制元件裡面的小控制元件來進行佈局分佈。它有如下的引數列表,
pack() 方法 |
描述 |
|---|---|
after=widget |
pack it after you have packed widget |
anchor=NSEW (or subset) |
position widget according to |
before=widget |
pack it before you will pack widget |
expand=bool |
expand widget if parent size grows |
fill=NONE or X or Y or BOTH |
fill widget if widget grows |
in=master |
use master to contain this widget |
in_=master |
see ‘in’ option description |
ipadx=amount |
add internal padding in x direction |
ipady=amount |
add internal padding in y direction |
padx=amount |
add padding in x direction |
pady=amount |
add padding in y direction |
side=TOP or BOTTOM or LEFT or RIGHT |
where to add this widget. |
通過更改 pack() 的引數,你可以獲取不同的控制元件佈局。
標籤的尺寸是由屬於標籤選項中的寬度和高度來定義的。
工慾善其事必先利其器,我們可以先來看看標籤物件裡面都有哪些屬性 options。通過 dict(label) 我們可以列出標籤物件的所有屬性。
from sys import version_info

if version_info.major == 2:
    import Tkinter as tk
elif version_info.major == 3:
    import tkinter as tk

from pprint import pprint

app = tk.Tk()
labelExample = tk.Label(app, text="This is a Label", height=15, width=100)
pprint(dict(labelExample))
得到的屬性字典如下,
{'activebackground': 'SystemButtonFace',
 'activeforeground': 'SystemButtonText',
 'anchor': 'center',
 'background': 'SystemButtonFace',
 'bd': <pixel object at 00000000048D1000>,
 'bg': 'SystemButtonFace',
 'bitmap': '',
 'borderwidth': <pixel object at 00000000048D1000>,
 'compound': 'none',
 'cursor': '',
 'disabledforeground': 'SystemDisabledText',
 'fg': 'SystemButtonText',
 'font': 'TkDefaultFont',
 'foreground': 'SystemButtonText',
 'height': 15,
 'highlightbackground': 'SystemButtonFace',
 'highlightcolor': 'SystemWindowFrame',
 'highlightthickness': <pixel object at 00000000048FF100>,
 'image': '',
 'justify': 'center',
 'padx': <pixel object at 00000000048FED40>,
 'pady': <pixel object at 00000000048FF0D0>,
 'relief': 'flat',
 'state': 'normal',
 'takefocus': '0',
 'text': 'This is a Label',
 'textvariable': '',
 'underline': -1,
 'width': 100,
 'wraplength': <pixel object at 00000000048FED70>}
知道標籤的所有屬性後,那你就可以通過更改它們來得到不同的標籤外觀。
更改標籤文字字型
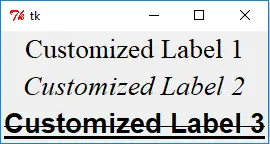
你可以用下面的例子來改變標籤中的文字字型。
from sys import version_info

if version_info.major == 2:
    import Tkinter as tk
elif version_info.major == 3:
    import tkinter as tk

import tkFont

app = tk.Tk()
labelExample1 = tk.Label(app, text="Customized Label 1", font=("Times", 20))
labelExample2 = tk.Label(app, text="Customized Label 2", font=("Times", 20, "italic"))

labelFont3 = tkFont.Font(
    family="Helvetica", size=20, weight=tkFont.BOLD, underline=1, overstrike=1
)
labelExample3 = tk.Label(app, text="Customized Label 3", font=labelFont3)
labelExample1.pack()
labelExample2.pack()
labelExample3.pack()
app.mainloop()

通過元組來設定標籤字型
labelExample1 = tk.Label(app, text="Customized Label 1", font=("Times", 20))
labelExample2 = tk.Label(app, text="Customized Label 2", font=("Times", 20, "italic"))
字型元組的第一個元素是字型名字,隨後的元素是大小,格式比如加粗,斜體,下劃線或者刪除線。
用 tkFont 字型物件來設定標籤字型
labelFont3 = tkFont.Font(
    family="Helvetica", size=20, weight=tkFont.BOLD, underline=1, overstrike=1
)
labelExample3 = tk.Label(app, text="Customized Label 3", font=labelFont3)
設定標籤文字字型屬性的另外一種方法是使用 tkFont 模組中的字型物件。labelExample3 的字型型別就是 Helvetica 字型系列,20 號,加粗,有下劃線以及粗細為 1 的刪除線。
from sys import version_info

if version_info.major == 2:
    import Tkinter as tk
elif version_info.major == 3:
    import tkinter as tk

import tkFont
from pprint import pprint

app = tk.Tk()
pprint(tkFont.families())
更改標籤顏色
fg 及 bg 屬性分別確定了標籤控制元件的前景色及背景色。
labelExample1 = tk.Label(app, text="Customized Color", bg="gray", fg="red")

標籤中顯示圖片
標籤中 image 屬性可以用來在標籤中顯示圖片。
from sys import version_info

if version_info.major == 2:
    import Tkinter as tk
elif version_info.major == 3:
    import tkinter as tk


app = tk.Tk()
logo = tk.PhotoImage(file="python.gif")
labelExample = tk.Label(app, image=logo)
labelExample.pack()
app.mainloop()

tk.PhotoImage 只能顯示 GIF,PPM/PPM/PGM 格式的圖片。如果圖片是其他格式的話,那它會報如下錯誤,_tkinter.TclError: couldn’t recognize data in image fileFounder of DelftStack.com. Jinku has worked in the robotics and automotive industries for over 8 years. He sharpened his coding skills when he needed to do the automatic testing, data collection from remote servers and report creation from the endurance test. He is from an electrical/electronics engineering background but has expanded his interest to embedded electronics, embedded programming and front-/back-end programming.
LinkedIn