PyQt5 教程 - 選單欄

選單欄通常位於 GUI 的左上角和標題欄下方。如果使用者單擊選單上的專案,則可能會執行開啟檔案,儲存檔案或退出應用程式之類的操作。
我們將學習如何啟動選單欄,將操作繫結到選單,新增快捷方式以及顯示狀態文字。
PyQt5 選單欄基本示例
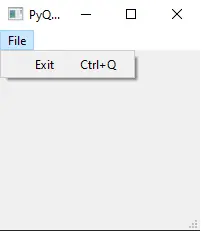
與大多數編輯器一樣,我們將建立第一個具有 File 選單的 PyQt5 選單欄示例。為了簡單起見,我們僅包含 Exit 子選單。
import sys
from PyQt5.QtWidgets import QMainWindow, QAction, qApp, QApplication


class basicMenubar(QMainWindow):
    def __init__(self, *args, **kwargs):
        super().__init__(*args, **kwargs)

        self.initUI()

    def initUI(self):

        self.setGeometry(200, 200, 200, 200)

        exitAction = QAction("&Exit", self)
        exitAction.setShortcut("Ctrl+Q")
        exitAction.setStatusTip("Exit application")
        exitAction.triggered.connect(qApp.quit)

        self.statusBar()

        menubar = self.menuBar()
        fileMenu = menubar.addMenu("&File")
        fileMenu.addAction(exitAction)

        self.setWindowTitle("PyQt5 Basic Menubar")
        self.show()


if __name__ == "__main__":

    app = QApplication(sys.argv)
    ex = basicMenubar()
    sys.exit(app.exec_())

menubar = self.menuBar()
QMainWindow 具有 menuBar() 方法來建立選單欄。
fileMenu = menubar.addMenu("&File")
fileMenu.addAction(exitAction)
fileMenu 以名稱 File 新增到選單欄,它由與 QAction 物件-exitAction 相關聯的選單項組成。
exitAction = QAction("&Exit", self)
exitAction.setShortcut("Ctrl+Q")
exitAction.setStatusTip("Exit application")
exitAction.triggered.connect(qApp.quit)
它建立 QAction 物件以退出應用程式,並將該物件儲存到變數 exitAction 中。
這個 QAction 物件的名稱為&Exit,並與快捷鍵 CTRL+Q 相關聯。
exitAction.setStatusTip("Exit application")
當使用者將滑鼠指標懸停在此選單項上時,它將在狀態列 self.statusBar 中顯示額外的訊息。
exitAction.triggered.connect(qApp.quit)
我們將觸發此退出操作的事件連線到應用程式的退出 slot。
PyQt5 選單欄選單項圖示
我們有兩種方法可以在 PyQt5 選單欄中設定選單項的圖示。
PyQt5 預設樣式的標準畫素圖
我們可以使用預設樣式的標準畫素圖將選單項圖示設定為標準圖示。
self.style().standardIcon(QStyle.SP_DialogCancelButton)
上面的程式碼選擇對話方塊取消的標準圖示。
![]()
import sys
from PyQt5.QtWidgets import QMainWindow, QAction, qApp, QApplication, QStyle


class basicMenubar(QMainWindow):
    def __init__(self, *args, **kwargs):
        super().__init__(*args, **kwargs)

        self.initUI()

    def initUI(self):

        self.setGeometry(200, 200, 200, 200)

        exitAction = QAction(
            self.style().standardIcon(QStyle.SP_DialogCancelButton), "&Exit", self
        )
        exitAction.setShortcut("Ctrl+Q")
        exitAction.setStatusTip("Exit application")
        exitAction.triggered.connect(qApp.quit)

        self.statusBar()

        menubar = self.menuBar()
        fileMenu = menubar.addMenu("&File")
        fileMenu.addAction(exitAction)

        self.setWindowTitle("PyQt5 Basic Menubar")
        self.show()


if __name__ == "__main__":

    app = QApplication(sys.argv)
    ex = basicMenubar()
    sys.exit(app.exec_())
將影象檔案與 QIcon 一起使用
除了上述使用 QStyle 中預設圖示的方法外,我們還可以使用 QIcon 類將任何影象檔案用作圖示。
QIcon("exit.png")
它將影象檔案 exit.png 設定為圖示。exit.png 檔案應與 Python 指令碼檔案位於同一資料夾中。
![]()
import sys
from PyQt5.QtWidgets import QMainWindow, QAction, qApp, QApplication, QStyle
from PyQt5.QtGui import QIcon


class basicMenubar(QMainWindow):
    def __init__(self, *args, **kwargs):
        super().__init__(*args, **kwargs)

        self.initUI()

    def initUI(self):

        self.setGeometry(200, 200, 200, 200)

        exitAction = QAction(QIcon("exit.png"), "&Exit", self)
        exitAction.setShortcut("Ctrl+Q")
        exitAction.setStatusTip("Exit application")
        exitAction.triggered.connect(qApp.quit)

        self.statusBar()

        menubar = self.menuBar()
        fileMenu = menubar.addMenu("&File")
        fileMenu.addAction(exitAction)

        self.setWindowTitle("PyQt5 Basic Menubar")
        self.show()


if __name__ == "__main__":

    app = QApplication(sys.argv)
    ex = basicMenubar()
    sys.exit(app.exec_())
PyQt5 選單欄可選中的選單項
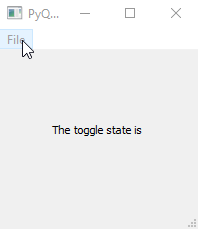
Checkable 選單項可以選中或取消選中,並且每次使用者單擊它時都會切換狀態。
我們需要在建立 QAction 物件時將關鍵字引數 checkable 設定為 True,以使選單項可檢查。
import sys
from PyQt5.QtWidgets import QMainWindow, QAction, qApp, QApplication, QLabel
from PyQt5.QtGui import QIcon
from PyQt5.QtCore import Qt


class basicMenubar(QMainWindow):
    def __init__(self):
        super().__init__()

        self.initUI()

    def initUI(self):

        self.setGeometry(200, 200, 200, 200)

        self.label = QLabel("The toggle state is ")
        self.label.setAlignment(Qt.AlignCenter)

        self.setCentralWidget(self.label)

        toggleAction = QAction("&Toggle Label", self, checkable=True)
        toggleAction.setStatusTip("Toggle the label")
        toggleAction.triggered.connect(self.toggleLabel)

        exitAction = QAction(QIcon("exit.png"), "&Exit", self)
        exitAction.setShortcut("Ctrl+Q")
        exitAction.setStatusTip("Exit application")
        exitAction.triggered.connect(qApp.quit)

        self.statusBar()

        menubar = self.menuBar()
        fileMenu = menubar.addMenu("&File")
        fileMenu.addAction(toggleAction)
        fileMenu.addAction(exitAction)

        self.setWindowTitle("PyQt5 Basic Menubar")
        self.show()

    def toggleLabel(self, state):
        self.label.setText("The toggle state is {}".format(state))


if __name__ == "__main__":

    app = QApplication(sys.argv)
    ex = basicMenubar()
    sys.exit(app.exec_())

toggleAction = QAction("&Toggle Label", self, checkable=True)
應該將 checkable 屬性設定為 True,以使我們在啟動 QAction 物件時可以選中選單項。
或者我們可以在建立物件後使用 setCheckable() 方法。
self.setCheckable(True)
可選中項的狀態是回撥函式的引數。因此,在定義函式時,應在引數中列出它。比如,
def toggleLabel(self, state):
狀態是布林型別,選中時為 True,未選中時為 False。
Founder of DelftStack.com. Jinku has worked in the robotics and automotive industries for over 8 years. He sharpened his coding skills when he needed to do the automatic testing, data collection from remote servers and report creation from the endurance test. He is from an electrical/electronics engineering background but has expanded his interest to embedded electronics, embedded programming and front-/back-end programming.
LinkedIn