PyQt5 教程 - 標籤

我們將學習在本教程中使用標籤控制元件 QLabel。
PyQt5 標籤控制元件 QLabel
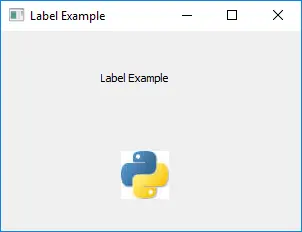
我們將在視窗中新增兩個標籤,其中一個標籤使用文字,另外一個標籤使用影象。
import sys
from PyQt5 import QtWidgets, QtGui


def basicWindow():
    app = QtWidgets.QApplication(sys.argv)
    windowExample = QtWidgets.QWidget()
    labelA = QtWidgets.QLabel(windowExample)
    labelB = QtWidgets.QLabel(windowExample)
    labelA.setText("Label Example")
    labelB.setPixmap(QtGui.QPixmap("python.jpg"))
    windowExample.setWindowTitle("Label Example")
    windowExample.setGeometry(100, 100, 300, 200)
    labelA.move(100, 40)
    labelB.move(120, 120)
    windowExample.show()
    sys.exit(app.exec_())


basicWindow()
其中,
labelA = QtWidgets.QLabel(w)
第一個標籤 labelA 是 QtWidgets.QtLabel,QtWidgets 控制元件 w 在括號中,這是因為它要告訴程式標籤 labelA 被新增到視窗 w。
labelA.setText("Label Example")
labelA.setText 設定標籤中的文字。
windowExample.setGeometry(100, 100, 300, 200)
它將視窗大小設定為 (300,200) 並將左上角座標設定為 (100,100)。你可以參考上一節中的 setGeometry 解釋。
labelA.move(100, 40)
labelB.move(120, 120)
move() 方法將標籤移動到右下方向。就像 labelA.move(100,40) 一樣,將 labelA 移動到相對於視窗左上角的 (100,40) 座標。
labelB.setPixmap(QtGui.QPixmap("globe.png"))
它在 labelB 中顯示影象。QPixmap 是 QtGui 中的模組,它是 Qt 採用的影象。

PyQt5 QLabel 設定字型
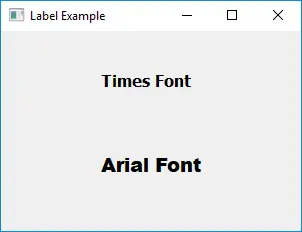
在上面的示例中,我們使用標籤控制元件中的預設字型,你可以指定想要的字型,如標籤文字字型的大小、重度和字型系列等。
import sys
from PyQt5 import QtWidgets, QtGui


def basicWindow():
    app = QtWidgets.QApplication(sys.argv)
    windowExample = QtWidgets.QWidget()
    labelA = QtWidgets.QLabel(windowExample)
    labelB = QtWidgets.QLabel(windowExample)
    labelA.setText("Times Font")
    labelA.setFont(QtGui.QFont("Times", 12, QtGui.QFont.Bold))
    labelB.setText("Arial Font")
    labelB.setFont(QtGui.QFont("Arial", 14, QtGui.QFont.Black))
    windowExample.setWindowTitle("Label Example")
    windowExample.setGeometry(100, 100, 300, 200)
    labelA.move(100, 40)
    labelB.move(100, 120)
    windowExample.show()
    sys.exit(app.exec_())


basicWindow()
labelA.setFont(QtGui.QFont("Times", 12, QtGui.QFont.Bold))
setFont() 方法設定標籤的字型。QFont 類指定具有特定屬性的字型。

PyQt5 標籤對齊
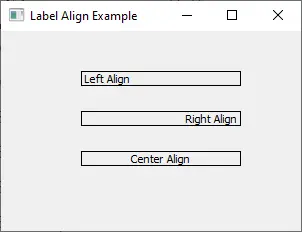
標籤文字預設情況下為左對齊,我們可以使用 QLabel.setAlignment() 方法來設定對齊方式。
import sys
from PyQt5 import QtWidgets, QtGui, QtCore


def basicWindow():
    app = QtWidgets.QApplication(sys.argv)
    windowExample = QtWidgets.QWidget()

    labelLeft = QtWidgets.QLabel(windowExample)
    labelRight = QtWidgets.QLabel(windowExample)
    labelCenter = QtWidgets.QLabel(windowExample)

    labelLeft.setText("Left Align")
    labelRight.setText("Right Align")
    labelCenter.setText("Center Align")

    windowExample.setWindowTitle("Label Align Example")
    windowExample.setGeometry(100, 100, 300, 200)

    labelLeft.setFixedWidth(160)
    labelRight.setFixedWidth(160)
    labelCenter.setFixedWidth(160)

    labelLeft.setStyleSheet("border-radius: 25px;border: 1px solid black;")
    labelRight.setStyleSheet("border-radius: 25px;border: 1px solid black;")
    labelCenter.setStyleSheet("border-radius: 25px;border: 1px solid black;")

    labelLeft.setAlignment(QtCore.Qt.AlignLeft)
    labelRight.setAlignment(QtCore.Qt.AlignRight)
    labelCenter.setAlignment(QtCore.Qt.AlignCenter)

    labelLeft.move(80, 40)
    labelRight.move(80, 80)
    labelCenter.move(80, 120)

    windowExample.show()
    sys.exit(app.exec_())


basicWindow()
labelLeft.setFixedWidth(160)
labelRight.setFixedWidth(160)
labelCenter.setFixedWidth(160)
它將三個標籤設定為固定寬度 160,假如不設定的話,它將根據標籤文字長度自動設定標籤寬度。
labelLeft.setStyleSheet("border-radius: 25px;border: 1px solid black;")
我們可以使用類似 CSS 的樣式表來設定 PyQt5 控制元件的樣式。在此,標籤的邊界設定為純黑色,邊界為 1px,邊界半徑指定為 25px。
labelLeft.setAlignment(QtCore.Qt.AlignLeft)
labelRight.setAlignment(QtCore.Qt.AlignRight)
labelCenter.setAlignment(QtCore.Qt.AlignCenter)
控制元件的對齊屬性由 setAlignment 方法設定,其選項位於模組 PyQt5.QtCore.Qt 中,例如
PyQt5.QtCore.Qt.AlignLeftPyQt5.QtCore.Qt.AlignRightPyQt5.QtCore.Qt.AlignCenter
從下圖可以看出,標籤是根據其對齊屬性來對齊的。

Founder of DelftStack.com. Jinku has worked in the robotics and automotive industries for over 8 years. He sharpened his coding skills when he needed to do the automatic testing, data collection from remote servers and report creation from the endurance test. He is from an electrical/electronics engineering background but has expanded his interest to embedded electronics, embedded programming and front-/back-end programming.
LinkedIn