JavaFX 媒體播放器

在本文中,我們將學習如何使用 JavaFX 在 Java 中製作媒體播放器。為此,我們將使用內建的 JavaFX 並手動進行設定。
使用內建 JavaFX 製作媒體播放器
要使用內建的 JavaFX,我們需要 Java 8,因為其中包含 JavaFX。我們不必單獨安裝它。
對於本節,我們使用以下工具。
- Java 8
- NetBeans 13(你可以使用你選擇的任何 IDE)
示例程式碼(Main.java,主類):
// write the package name (yours may be different)
package com.mycompany.main;

// import necessary libraries
import static javafx.application.Application.launch;

import java.net.URL;
import javafx.application.Application;
import javafx.scene.Scene;
import javafx.scene.layout.Pane;
import javafx.scene.media.Media;
import javafx.scene.media.MediaPlayer;
import javafx.scene.media.MediaView;
import javafx.stage.Stage;

// Main Class
public class Main extends Application {
  // main method
  public static void main(String[] args) {
    launch(args);
  } // end main method

  /**
   *
   * @param primaryStage
   * @throws Exception
   */
  @Override
  public void start(Stage primaryStage) throws Exception {
    // path to the file
    final URL resource = getClass().getResource("/music/audio.mp3");

    // create Media Object and pass it the path of the audio file
    Media mediafile = new Media(resource.toString());

    // create MediaPlayer Object and pass the mediafile instance to it
    MediaPlayer player = new MediaPlayer(mediafile);

    // Add a mediaView, to display the media. Its necessary !
    // This mediaView is added to a Pane
    MediaView mediaView = new MediaView(player);

    // Add to scene
    Scene scene = new Scene(new Pane(mediaView), 400, 200);

    // Show the stage
    primaryStage.setTitle("Media Player");
    primaryStage.setScene(scene);
    primaryStage.show();

    // Play the media once the stage is shown
    player.play();

  } // end start
} // end Main Class
要使用 JavaFX,我們需要一個主啟動類,它必須擴充套件 Application 類(自 Java 8 以來 Java 中的標準類)。主啟動類的名稱是 Main,它也擴充套件了 Application 類。
我們可以說 Main 類是 Application 類的子類。因此,它需要實現所有抽象方法,這就是 Main 類覆蓋 start() 方法的原因。
start() 函式接受一個 Stage 型別引數。它是顯示 JavaFX 應用程式的所有可視部分的地方。
Stage 型別物件是由 JavaFX 執行時為我們建立的。我們不必手動建立它。
在 start() 方法中,我們獲取音訊檔案的路徑並將其儲存在 resource 變數中,該變數以字串格式傳遞給 Media 建構函式,並進一步傳遞給 MediaPlayer 建構函式.接下來,我們新增一個 mediaView 來呈現/顯示媒體,這是必要的。
然後,這個 mediaView 被新增到 Pane。我們需要將 Scene 新增到 Stage 物件中,該物件將用於在 JavaFX 應用程式的視窗中顯示某些內容。
請記住,需要在 JavaFX 應用程式中顯示的所有元件都必須位於 Scene 內。對於這個例子,我們將一個 Scene 物件與媒體檢視一起新增到 Stage。
之後,我們設定標題,設定場景,並在舞臺展示後播放媒體。
現在,來到 main 方法。你知道我們可以在沒有 main() 函式的情況下啟動 JavaFX 應用程式,但是當我們需要將命令列引數傳遞給應用程式時很有用。
設定 JavaFX 並使用它來製作媒體播放器
要手動安裝 JavaFX,我們需要具備以下條件。
- Java 18
- NetBeans 版本 13(你可以使用你選擇的任何 IDE)
- 更新
module-info.java和pom.xml檔案以安裝javafx.controls和javafx.media(每個檔案的完整程式碼如下所示) - 我們正在使用 Maven 來安裝依賴項。你可以使用 Gradle。
示例程式碼(module-info.java 檔案):
module com.mycompany.test {
  requires javafx.controls;
  requires javafx.media;
  exports com.mycompany.test;
}
示例程式碼(pom.xml 檔案):
<project xmlns="http://maven.apache.org/POM/4.0.0" xmlns:xsi="https://www.w3.org/2001/XMLSchema-instance"
xsi:schemaLocation="http://maven.apache.org/POM/4.0.0 http://maven.apache.org/maven-v4_0_0.xsd">
    <modelVersion>4.0.0</modelVersion>
    <groupId>com.mycompany</groupId>
    <artifactId>Test</artifactId>
    <version>1.0-SNAPSHOT</version>
    <properties>
        <project.build.sourceEncoding>UTF-8</project.build.sourceEncoding>
        <maven.compiler.release>11</maven.compiler.release>
        <javafx.version>16</javafx.version>
        <javafx.maven.plugin.version>0.0.6</javafx.maven.plugin.version>
    </properties>
    <dependencies>
        <dependency>
            <groupId>org.openjfx</groupId>
            <artifactId>javafx-controls</artifactId>
            <version>${javafx.version}</version>
        </dependency>
        <dependency>
            <groupId>org.openjfx</groupId>
            <artifactId>javafx-media</artifactId>
            <version>${javafx.version}</version>
        </dependency>
    </dependencies>

    <build>
        <plugins>
            <plugin>
                <groupId>org.apache.maven.plugins</groupId>
                <artifactId>maven-compiler-plugin</artifactId>
                <version>3.8.1</version>
                <configuration>
                    <release>${maven.compiler.release}</release>
                </configuration>
            </plugin>
            <plugin>
                <groupId>org.openjfx</groupId>
                <artifactId>javafx-maven-plugin</artifactId>
                <version>${javafx.maven.plugin.version}</version>
                <configuration>
                    <mainClass>com.mycompany.test.App</mainClass>
                </configuration>
            </plugin>
        </plugins>
    </build>
</project>
示例程式碼(App.java,主類):
// write the package name (yours may be different)
package com.mycompany.test;

// import necessary libraries
import java.net.URL;
import javafx.application.Application;
import javafx.scene.Scene;
import javafx.scene.layout.Pane;
import javafx.scene.media.Media;
import javafx.scene.media.MediaPlayer;
import javafx.scene.media.MediaView;
import javafx.stage.Stage;

/**
 * JavaFX App
 */
public class App extends Application {
  /**
   *
   * @param primaryStage
   */
  @Override
  public void start(Stage primaryStage) {
    // path to the file
    final URL resource = getClass().getResource("/music/video.mkv");

    // create Media Object and pass it the path of the video/audio file
    Media mediafile = new Media(resource.toString());

    // create MediaPlayer Object and pass the mediafile instance to it
    MediaPlayer player = new MediaPlayer(mediafile);

    // Add a mediaView, to display the media. Its necessary !
    // This mediaView is added to a Pane
    MediaView mediaView = new MediaView(player);

    // Add to scene
    Scene scene = new Scene(new Pane(mediaView), 1080, 750);

    // Show the stage
    primaryStage.setTitle("Media Player");
    primaryStage.setScene(scene);
    primaryStage.show();

    // Play the media once the stage is shown
    player.play();
  }

  // main method
  public static void main(String[] args) {
    launch(args);
  } // end main method

} // end App class
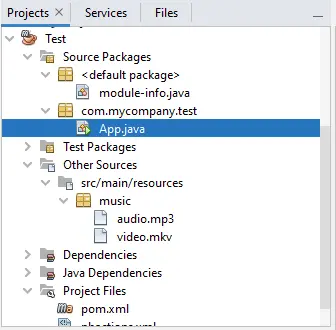
在 Java 應用程式中,module-info.java 和 pom.xml 檔案位於 default package 和 Project Files 中。下面是一個 Java 應用程式中所有檔案的截圖,以便清楚地瞭解。

這段程式碼和上一節使用內建 JavaFX 製作媒體播放器相同,不同的是我們手動安裝 JavaFX 並播放視訊檔案。
