在 Angular 中檢視子元件

@ViewChild 是 Angular 中最常用的裝飾器。它是我們在學習 Angular 時遇到的第一個裝飾器之一。
@ViewChild 具有本教程中討論的許多功能,每個用例都有實際示例。
@ViewChild 是一個配置檢視查詢的屬性裝飾器。如果檢視 DOM 發生更改並且新的子項與選擇器匹配,則更新該屬性。
我們可以將@ViewChild 與指令、DOM 元素和子元件一起使用。我們可以在示例中瞭解如何使用@ViewChild。
讓我們使用以下命令建立一個新應用程式。
# angular
ng new my-app
在 Angular 中建立我們的新應用程式後,我們將使用此命令轉到我們的應用程式目錄。
# angular
cd my-app
現在,讓我們執行我們的應用程式來檢查所有依賴項是否安裝正確。
# angular
ng serve --open
讓我們建立一個指令 LanguageDirective。該指令將查詢具有屬性 appLanguage 的元素,並在元素中新增單詞 Language 的文字。
有兩種方法可以使用 @angular/cli 生成指令或建立檔案 language.directive.ts。
# Angular
ng generate directive language --skip-tests
該命令將建立一個 language.directive.ts 檔案並將指令新增到 app.module.ts 檔案中。我們將使用 ElementRef 和 Renderer2 來重寫文字。
因此,我們在 language.directive.ts 中的程式碼將如下所示。
# angular
import {
  Directive,
  ElementRef,
  Renderer2
} from '@angular/core';

@Directive(
  { selector: '[appLanguage]' }
)
export class LanguageDirective {
  language = 'NodeJs';

  constructor(elem: ElementRef, renderer: Renderer2) {
    let language = renderer.createText('Language ');
    renderer.appendChild(elem.nativeElement, language);
  }
}
app.module.ts 中的程式碼如下所示。
# Angular
import { NgModule } from '@angular/core';
import { BrowserModule } from '@angular/platform-browser';
import { FormsModule } from '@angular/forms';
import { AppComponent } from './app.component';
import { HelloComponent } from './hello.component';
import { LanguageDirective } from './language.directive';

@NgModule({
  imports: [BrowserModule, FormsModule],
  declarations: [AppComponent, HelloComponent, LanguageDirective],
  bootstrap: [AppComponent],
})
export class AppModule {}
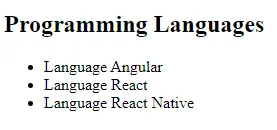
將 appLanguage 屬性新增到元件模板中包含文字的 li。因此,我們在 app.component.html 中的程式碼將如下所示。
# Angular
<h2>Programming Languages</h2>
<ul>
  <li appLanguage>Angular</li>
  <li appLanguage>React</li>
  <li appLanguage>React Native</li>
</ul>
輸出:

元素內容前的單詞 Language 也可以訪問 LanguageDirective 的例項變數並使用其值設定 extraLanguage 例項變數。
因此,我們在 app.component.ts 中的程式碼將如下所示。
# Angular
import { Component, ViewChild, AfterViewInit } from '@angular/core';
import { LanguageDirective } from './language.directive';

@Component({
  selector: 'my-app',
  templateUrl: './app.component.html',
  styleUrls: ['./app.component.css'],
})
export class AppComponent implements AfterViewInit {
  extraLanguage!: string;

  @ViewChild(LanguageDirective)
  set appLanguage(directive: LanguageDirective) {
    this.extraLanguage = directive.language;
  }

  ngAfterViewInit() {
    console.log(this.extraLanguage); // NodeJs
  }
}
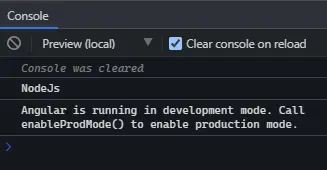
我們在上面的程式碼中使用了一個 setter 來設定 extraLanguage 變數。
現在,你會注意到它將等待 AfterViewInit 生命週期掛鉤來訪問變數,因為在載入初始檢視後子元件和指令變得可用。
輸出:

上面的輸出表明父元件可以使用 @ViewChild 訪問指令中的值。
在 Angular 中將 ViewChild 與 DOM 元素一起使用
在本例中,我們將遍歷 DOM 元素並使用 @ViewChild 訪問它們。 @ViewChild 允許我們使用模板引用變數訪問本機 DOM 元素。
讓我們使用以下命令建立一個新應用程式。
# angular
ng new my-app
在 Angular 中建立我們的新應用程式後,我們將使用此命令轉到我們的應用程式目錄。
# angular
cd my-app
現在,讓我們執行我們的應用程式來檢查所有依賴項是否安裝正確。
# angular
ng serve --open
例如,我們在 app.component.html 中有一個輸入標籤,其中 #forViewChild 引用變數顯示在下面的程式碼中。
# Angular
<input #forViewChild placeholder="Your favorite Programming Language">
我們還將在 app.component.css 中新增一些 CSS。
# Angular
p {
  font-family: Lato;
}
input {
  padding: 5px 10px;
}
label {
  font-size: 20px;
  padding-right: 10px;
}
輸出:

現在,我們可以使用 @ViewChild 訪問輸入並設定值。app.component.ts 中的程式碼如下所示。
# angular
import { Component, ViewChild, AfterViewInit, ElementRef } from '@angular/core';

@Component({
  selector: 'my-app',
  templateUrl: './app.component.html',
  styleUrls: ['./app.component.css'],
})
export class AppComponent implements AfterViewInit {
  @ViewChild('forViewChild') forViewChild!: ElementRef;
  ngAfterViewInit() {
    this.forViewChild.nativeElement.value = 'Angular!';
  }
}
因此,當 ngAfterViewInit 執行時,輸入值將被更改並設定為 Angular!如下例所示。
輸出:

正如你在上面的示例中看到的,父元件使用 @ViewChild 設定子 DOM 元素的值。
在 Angular 中將 ViewChild 與子元件一起使用
使用@ViewChild,我們可以訪問子元件並呼叫子元件可用的方法或例項變數。現在我們將通過一個示例來了解如何在 Angular 中將 @ViewChild 與子元件一起使用。
讓我們使用以下命令建立一個新應用程式。
# angular
ng new my-app
在 Angular 中建立我們的新應用程式後,我們將使用此命令轉到我們的應用程式目錄。
# angular
cd my-app
現在,讓我們執行我們的應用程式來檢查所有依賴項是否安裝正確。
# angular
ng serve --open
現在,讓我們建立一個新元件作為 HelloComponent。
我們可以通過兩種方式建立一個新元件。通過使用 @angular/cli 並執行以下命令。
# Angular
ng generate component hello --flat --skip-tests
使用此命令,將建立 hello.component.ts、hello.component.html 和 hello.component.css 檔案。或者我們可以手動建立這些檔案。
現在,在 app.module.ts 中,我們需要新增新建立的元件。app.module.ts 中的程式碼如下所示。
# Angular
import { NgModule } from '@angular/core';
import { BrowserModule } from '@angular/platform-browser';
import { FormsModule } from '@angular/forms';

import { AppComponent } from './app.component';
import { HelloComponent } from './hello.component';

@NgModule({
  imports:      [ BrowserModule, FormsModule ],
  declarations: [ AppComponent, HelloComponent ],
  bootstrap:    [ AppComponent ]
})
export class AppModule { }
我們將向 HelloComponent 新增 GreetingMessage 方法以返回訊息。
# Angular
import { Component, OnInit } from '@angular/core';

@Component({
  selector: 'hello',
  templateUrl: './hello.component.html',
  styleUrls: ['./hello.component.css'],
})
export class HelloComponent implements OnInit {
  constructor() {}

  GreetingMessage() {
    return 'Hello Member!';
  }

  ngOnInit(): void {}
}
現在,我們將使用 <hello> 引用 app.component.html 中的子元件。因此,我們的程式碼將如下所示。
# Angular
<hello>It Works</hello>
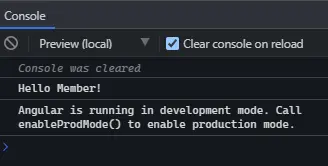
我們將使用 @ViewChild 從父元件類 app.component.ts 呼叫 GreetingMessage 方法。因此,我們的程式碼將如下所示。
# Angular
import { Component, ViewChild, AfterViewInit } from '@angular/core';
import { HelloComponent } from './hello.component';

@Component({
  selector: 'my-app',
  templateUrl: './app.component.html',
  styleUrls: ['./app.component.css'],
})
export class AppComponent {
  @ViewChild(HelloComponent) hello!: HelloComponent;

  ngAfterViewInit() {
    console.log(this.hello.GreetingMessage());
  }
}
輸出:

本教程通過示例教我們如何在不同情況下使用@ViewChild。
Rana is a computer science graduate passionate about helping people to build and diagnose scalable web application problems and problems developers face across the full-stack.
LinkedIn